Single Sign-On (SSO) is one of the most common requirements in enterprise Salesforce implementations. Instead of managing separate usernames and passwords across applications, SSO allows users to authenticate once and access multiple systems securely.
In this guide, we’ll walk through a practical step-by-step process to configure Salesforce SSO using SAML, one of the most widely used authentication protocols.
Whether you’re a Salesforce Admin, Developer, or Architect, understanding SSO configuration is an essential skill in enterprise environments.
What is Single Sign-On (SSO)?
Single Sign-On allows users to log in once through a trusted identity provider and then access multiple applications without needing to authenticate again.
For example, a user might log in through an identity provider such as:
Okta
Microsoft Entra ID
Ping Identity
Once authenticated, the user can seamlessly access Salesforce and other connected systems.
How Salesforce SSO Works
Most Salesforce SSO implementations use SAML.
Here’s the high-level flow.
SSO Authentication Flow
User
↓
Attempts to access Salesforce
↓
Salesforce redirects user to Identity Provider
↓
User authenticates with Identity Provider
↓
Identity Provider sends SAML Assertion
↓
Salesforce validates assertion
↓
User is logged into Salesforce
This architecture allows organizations to centralize authentication and improve security.
Prerequisites
Before setting up SSO in Salesforce, ensure the following:
✔ System Administrator access in Salesforce ✔ Identity Provider metadata (from Okta/Azure AD etc.) ✔ SAML certificate from the Identity Provider ✔ Identity Provider Login URL ✔ Entity ID details
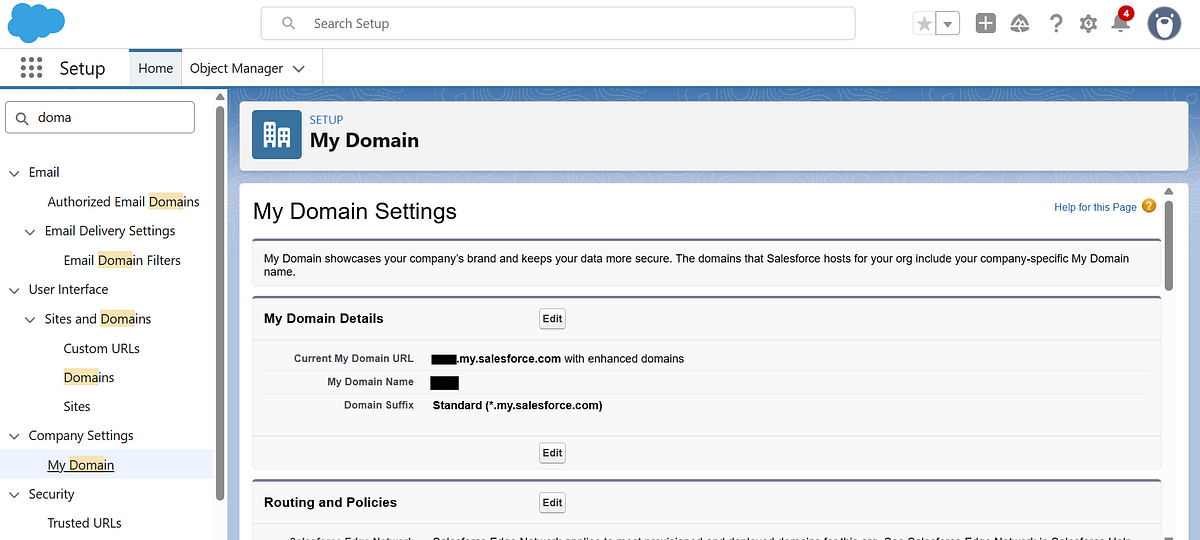
Step 1: Enable My Domain
SSO requires My Domain to be configured in Salesforce.
Navigate to:
Setup → My Domain
Register and deploy your custom Salesforce domain.
Example:
https://yourcompany.my.salesforce.com
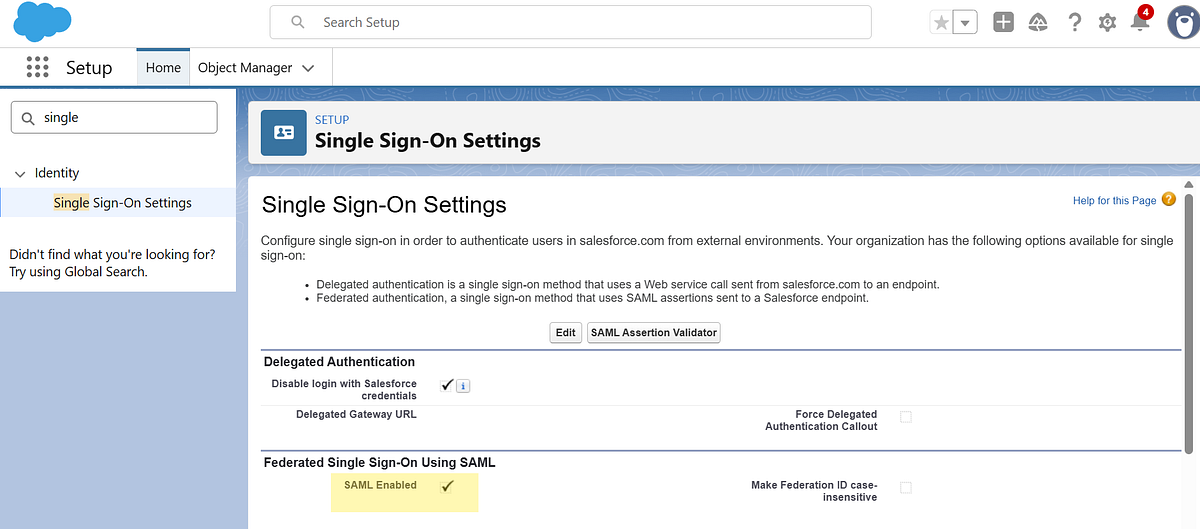
Step 2: Enable SAML Authentication
Navigate to:
Setup → Single Sign-On Settings
Then enable SAML Enabled.
Step 3: Create a New SAML Configuration
Navigate to Single Sign-On Settings and click New to create a new SAML configuration.
You can configure the SAML settings in two ways:
Upload from URL — Provide the metadata URL from your Identity Provider (recommended for automatic updates).
Upload File — Alternatively, upload the metadata XML file manually if you have it downloaded.
Choose the method that best fits your setup, then proceed with the configuration.
Step 4: Configure User Identification
Salesforce must determine which user is logging in.
This is done using the SAML Assertion.
Common identifiers include:
Username
Federation ID
Best practice in enterprise environments is to use Federation ID because it provides flexibility when usernames change. The Federation ID in Salesforce must match the identifier sent by the Identity Provider.
Step 5: Test the SSO Configuration
After saving your SAML configuration, Salesforce provides a Test-Only Initialization URL.
You can find this URL by:
Navigating to Setup → Single Sign-On Settings
Clicking on your newly created SAML configuration
Locating the “Test-Only Initialization URL” field
Use this URL to validate your SSO setup before enabling it for all users. This ensures that authentication is working correctly without impacting existing login flows.
Common Mistakes to Avoid
During SSO setup, these issues frequently occur.
1. Certificate Expiration
Always monitor IdP certificates and renew them before expiration.
2.Federation ID Mismatch
Ensure the identifier in Salesforce matches the SAML assertion.
3.Lockout Risk
Always maintain one non-SSO admin login to avoid being locked out.
Grounding Your Salesforce Agent With Real-World Data (RAG, Chunking, Data Library & More!)
If Part 1 was about understanding what Agentforce is, Part 2 is all about understanding how your agent becomes smart, trustworthy, and actually useful in the real world.
And the secret is Grounding. (Yes, the dramatic capital G is intentional 😄)
Let’s dive in.
🌍 What Is Grounding? (And Why Your Agent Needs It)
Grounding = connecting your AI agent to trusted, authoritative data so it answers based on facts — not imagination.
When you ask an agent a question like:
“What is the refund policy for our subscription product?”
It shouldn’t hallucinate. It should look at:
Your internal Knowledge Articles
Your Pricing policies
Your Product documentation
Your CRM records
Your Product database, etc.
That is grounding.
It tells the LLM: 👉 “Use THIS data only. Stay within THIS reality.”
The Building Blocks of an Agent
Even a perfectly grounded agent needs the right internal structure. Salesforce defines three essential elements that make up an agent:
1. Topics
Define what the agent is responsible for Example: “Refund Requests”, “Appointment Scheduling”, “Order Status”
2. Instructions
Tell the agent how to behave, what to avoid, and what rules to follow Example: “Always verify customer identity before sharing account details.”
3. Actions
Specific things the agent can perform Examples:
Create a Case
Update an Order
Fetch Customer Details
⭐ Connect Actions to Data with Four Mechanisms
Grounding isn’t just about finding the right information — your agent must also know how to use that information when performing real actions. In Agentforce, this connection happens through four powerful data-access mechanisms. Each mechanism tells the agent where the data lives and how it should be retrieved or modified.
These mechanisms act like different “doors” through which the agent can reach your business data, depending on what the task requires.
1️⃣ Grounded Actions — When your data is stored natively in Salesforce
Use Grounded Actions when the agent needs to work directly with Salesforce data you already trust — such as:
Accounts
Contacts
Leads
Cases
Opportunities
Custom objects
Grounded Actions allow the agent to read and write this data safely, using the platform’s built-in permissions and security model. Perfect for CRM-centric tasks like:
“Update the case priority.”
“Create a follow-up task.”
“Find all opportunities closing this month.”
Because the agent uses real Salesforce objects, its decisions stay grounded in accurate, structured information.
2️⃣ Data Graph — When you need connected, contextual information
Sometimes data lives across many related objects. That’s where the Data Graph comes in.
A Data Graph gives your agent a relationship-aware view of your Salesforce data. You define a “graph” of objects and their connections — for example:
Customer → Orders → Order Line Items → Products
Your agent can then reason across the entire graph as a single interconnected dataset.
Useful for:
Customer 360 tasks
Order history analyses
Eligibility checks
Product recommendations
The Data Graph works best when decisions depend on multiple objects connected through relationships.
3️⃣ Actions on CRM and External Systems — When data lives beyond Salesforce
Businesses don’t live in one system, and neither should your agent.
This mechanism allows your Agentforce agent to interact with:
External APIs
Integration platforms
Back-office applications
Custom REST endpoints
Examples:
Fetching shipment tracking from a logistics system
Pulling credit score from a partner API
Checking inventory in a warehouse system
This expands your agent’s capabilities far beyond CRM and ensures it has access to real-time operational data, even if it lives outside Salesforce.
4️⃣RAG: The Heart of Grounding
Retrieval-Augmented Generation (RAG) means the agent:
Receives a user query
Retrieves relevant, real-world data
Uses that data to generate grounded, factual output
LLMs don’t know your business. RAG lets them pull knowledge from YOUR data before generating an answer.
Great for: ✔ precise lookups ✔ numerical or identifier-based queries
Example:
“What is the warranty period for product XYZ123?”
A simple CRM lookup might be enough.
2️⃣ Unstructured Data
Humans love writing. Machines don’t love parsing it. Examples:
PDFs
Policy documents
Web pages
Meeting transcripts
User manuals
Knowledge articles
This is where LLMs shine — but only if you help them access the right parts.
3️⃣ Semi-Structured
A mix. Examples:
JSON
XML
Chat logs
Formatted docs
🔥Most organizations have tons of unstructured content lying around — but it’s rich with answers. RAG makes unstructured data searchable, relevant, and safe to use inside an AI workflow.
📚 Introducing Agentforce Data Library
(Where Chunking, Indexing & Retrieval Live)
Agentforce uses the Agentforce Data Library (ADL) to ingest, transform, index, and prepare your data for retrieval.
Think of ADL as the “data brain” behind your agent.
🔨 How Data Library Works (The Real Magic)
Let’s break it down into digestible steps.
🧩 1. Chunking — Breaking Large Content Into Smart Pieces
LLMs can’t read a 40-page PDF and decide which part is relevant. So ADL automatically chops your documents into smaller, meaningful “chunks.”
Example:
A 20-page Refund Policy PDF → 200 chunks
A product manual → 100 chunks
Each chunk becomes a small searchable unit.
👉 This makes retrieval fast, accurate, and context-rich.
🗂 2. Indexing — Creating a High-Speed Search Layer
After chunking, ADL builds a vector index.
In simple terms:
Each chunk becomes an embedding (mathematical representation of meaning)
These embeddings are placed in an index
When the agent gets a question, it finds the most similar chunks
This is the backbone of RAG.
🧭 3. Retriever — The Engine That Finds Relevant Chunks
The retriever is what actually searches the index.
When a user asks: 👉 “What are the cancellation rules for Enterprise Customers?”
The retriever fetches:
Enterprise contract policies
SLA docs
Pricing schedules
Relevant knowledge articles
These chunks are sent to the LLM along with the prompt template.
⚙️ 4. Setup-Time vs Run-Time — What Happens When?
Setup-Time (When You Configure ADL):
✔ You add data sources (files, knowledge articles, objects) ✔ ADL creates a Data Stream ✔ Chunking happens ✔ Indexing happens ✔ Retriever is prepared ✔ Metadata + mappings are generated ✔ You reference the retriever in your agent’s design
Run-Time (When the Agent Is Live):
User asks a question
Retriever searches the index
Most relevant chunks are selected
Prompt template is filled with these chunks
LLM generates grounded response
Agent returns accurate, policy-compliant output
🧪 A Practical Example — Making a “Refund & Warranty Support Agent”
Imagine you upload:
3 Warranty policy PDFs
50 Knowledge articles
A troubleshooting guide
A CSV of product models
ADL will: 🟦 Chunk PDFs → 700 chunks 🟦 Chunk support documents → 300 chunks 🟦 Create embedding index 🟦 Build retriever 🟦 Allow agent to pull relevant blocks at runtime
Then your agent can answer: 💬 “What’s the refund window for Model Z?” 💬 “Do premium users get extended warranty?” 💬 “Can I return a product without invoice?”
With incredible accuracy — because it uses YOUR content.
AI isn’t just “nice to have” anymore — it’s becoming the engine behind faster decision-making, smoother workflows, and smarter experiences. And at the heart of Salesforce’s AI evolution lies its Agentic AI framework: Einstein Copilot, Prompt Builder, and Agentforce.
This article kicks off my new series on Agentic AI 🤖✨ where I break down concepts, real-world use cases, best practices, and hands-on tutorials.
Welcome to Part 1!
🌟 What Is Agentic AI?
In simple terms, Agentic AI means AI that not only answers questions but takes actions. It doesn’t just respond — it executes, decides, and automates, based on natural language instructions.
Salesforce brings this to life with:
🧠 Einstein Copilot
A conversational AI assistant that lives inside Salesforce and can:
Generate responses
Summarize
Draft content
Pull Salesforce data via grounded reasoning
Execute actions using skills
🧱 Prompt Builder
Configure grounded prompts, connect them with data using Prompt Templates, and test outputs — the bridge between natural language and structured Salesforce logic.
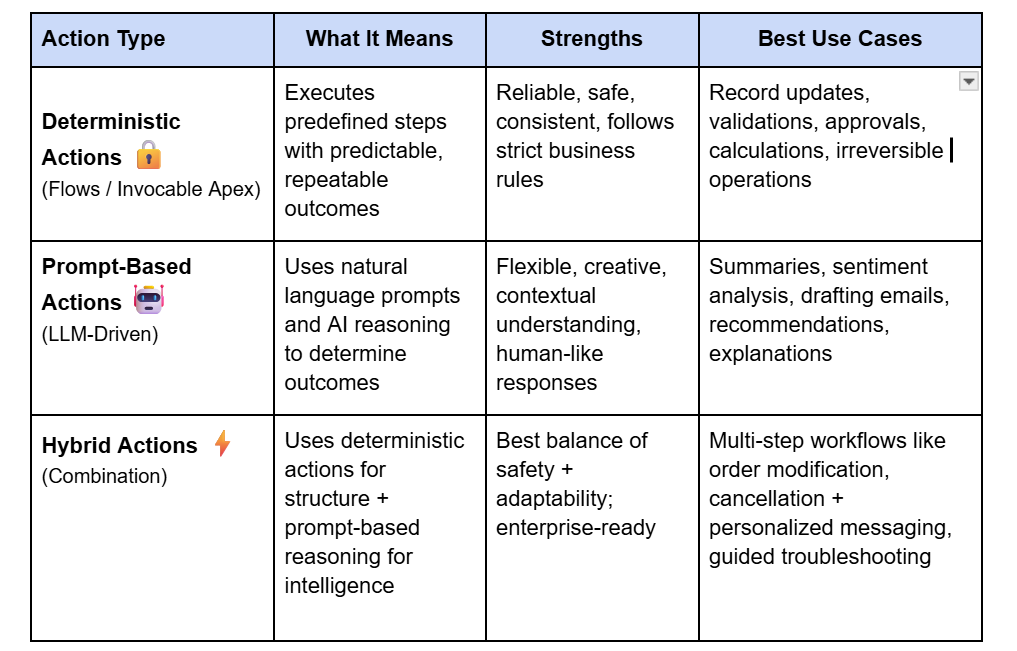
🧭 Deterministic vs Prompt-Based Actions — A Key Design Choice in Agentic AI
As you start building agents, one of the most important architectural decisions you’ll make is choosing between deterministic and prompt-based actions. Salesforce highlights this in the Prototype the Agent Trailhead module, and it’s a foundational part of designing safe, reliable AI systems.
In most real-world solutions, the best approach is hybrid:
Use deterministic actions for high-impact business logic.
Use prompt-based reasoning for contextual understanding, conversation, and content generation.
For example:
“Cancel my subscription” → Deterministic flow handles cancellation → Prompt-based action generates an empathetic message: “We’re sorry to see you go — could you share what didn’t work?”
This balance keeps the agent safe, smart, and human-like — all at once.
I’ll dive deeper into this in the upcoming articles of this series, where we’ll prototype an actual agent step-by-step. 🚀
🧪 Why Salesforce’s Agentic AI Matters
✔ Eliminates repetitive tasks ✔ Makes CRM processes 10× faster ✔ Reduces human errors ✔ Gives business teams autonomy without developer dependency ✔ Allows developers to scale impact with AI-first architectures
And the best part? It’s all native, secure, and trust-layer protected 🔒.
📚 What I Used as Sources
Salesforce Trailhead: Einstein Copilot Basics
Salesforce Docs: Copilot Overview
Salesforce Docs: AI Agent Types & Setup
🎉 Final Thoughts
Agentic AI isn’t the future — it’s the now. If you’re in Salesforce development, architecture, or admin work, this is your moment to embrace the shift.
This article is Part 1 of my Agentic AI Series. Next up: 👉 Part 2: How to Build Your First Einstein Copilot Prompt (Real Example)